Firelite Tech Support

  • Subscribe to our RSS feed.
  • Twitter
  • StumbleUpon
  • Reddit
  • Facebook
  • Digg
Showing posts with label alcohol burner. Show all posts

Saturday, 21 January 2012

The FeatherFire Alcohol Stove

Posted on 11:04 by Unknown
Today, I'd like to review the FeatherFire alcohol stove from PackaFeather.com.
The FeatherFire alcohol stove from PackaFeather.com
Thank you! to "RingTail" of Colorado for sending this stove for me to review.

OK, so what's the FeatherFire's claim to fame?  It simmers.  In fact, it simmers really well.  And not only does it simmer well, it does so on-the-fly without having to remove the pot or adding any simmer rings or other separate pieces.  Nice.

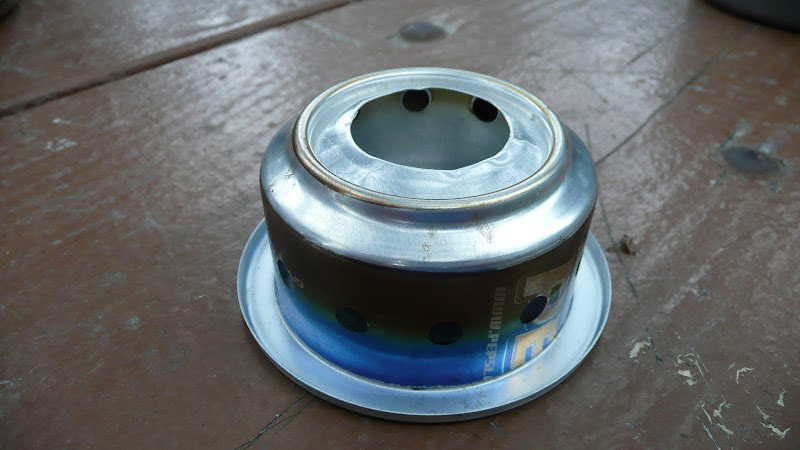
Let's have a look.  The FeatherFire is a chimney type stove, similar to a BrassLite stove or a 12-10 stove from TrailDesigns.com.  If you look closely at the photo below, you can just see the ventilation ports underneath the silver colored band of metal.
The ventilation ports on a FeatherFire stove
The first thing I notice about the FeatherFire is that it has outstanding build quality.  I've seen a lot of alcohol stoves.  This one is just really nicely made.  For example, the stove comes with built in pot supports.  Each pot support has a fairly elaborate twist that allows it to a) retract under the stove for transport and b) to lock into place against the body of the stove while cooking.  Every bend in the pot support is just so.  Excellent build quality.  
Every bend in the pot supports is precisely done.
The pot supports, as I mentioned, rotate underneath the body of the stove for transport.
The pot supports, rotated underneath the body of the stove.
The pot supports still take up room, but I found the stove packed reasonably well in my 1000ml Snow Peak pot.  I had room in my pot for the stove, a Sierra Cup, and a windscreen.  I added a bandana (not shown in photo) to prevent rattling and to pad the stove.
A FeatherFire stove, packed into a 1000ml pot with a Sierra Cup and a windscreen
Now, I mentioned simmering, and in fact that is what sets this stove apart from many other alcohol stoves.  How does it do it?  Take a look at the below photo.  Notice that silver colored band of metal?  That band is directly over the ventilation ports.
A sliver colored metal band is situated directly over the ventilation ports.  Note also the position of the pot support, locked into cooking position. 
The metal band is held in place by the pot supports.
Detail of metal band and pot supports.
At the end of the metal band lies the secret to this stove's ability to simmer:  The "worm gear," so named I suppose because it looks a bit like a worm crawling when the screw is turned. 
The "worm gear" on a FeatherFire stove
The worm gear tightens or loosens the metal band over the ventilation ports.  Tighten the band, the stove gets less air, and the flame gets smaller.  
A FeatherFire stove with the metal band tightly closed (simmering mode) 
Loosen the band, the stove gets more air, and the flame gets larger.  Ingenious!
A FeatherFire stove with the metal band in the fully open position (maximum flame)
OK, great, but how do you open up and close up the metal band?  Take a look at the below photo.
The control cable on a FeatherFire stove
See that cable with the knob on the end?  Just turn the knob.

That's it?  That's all you have to do?

Yep, that's it.  Turn the knob left to increase the flame.  Turn the knob right to reduce the flame.  And the best part?  The cable sticks out past your windscreen.  You can adjust the flame "on-the-fly," and you never have to burn your hand trying to drop a simmer ring into place.  You never even have to take the pot off the stove.  SWEET!
The control cable and knob on a FeatherFire extend out past the windscreen.
So, in practical terms, what does this look like?  Well, I'll show you.  Take a look at the two photos below.  Notice any difference in the flames?
A FeatherFire stove on maximum.
A FeatherFire stove with the flame turned down as far as it will go (simmering mode)
So, what kind of effect on my cooking is this going to have?  Well, you can go from a full-on roiling boil.
A full roiling boil with a FeatherFire on maximum flame.
To a nice, low simmer.
A very nice, low simmer with a FeatherFire stove on lowest flame
Guys, do you see the difference between the two photos above?  That's a nice range.  And what a great simmer.  That's as good of a simmer as I get on a gas stove.  And that's "on the fly."  In other words, I brought the water to a roiling boil, and then I reduced it to a very low simmer -- without ever taking the pot off the stove.  That's pretty darned good.  I was impressed.

Well, boiling water is all well and fine, but can it cook?  

Fair question.  Hmm.  Now, let's see.  What would be a good test?  How about my favorite, an omelet?  If an alcohol stove can cook an omelet, then that's a pretty good cooking stove in my opinion.  Let's give it a try.
A small backpacking type pan on a FeatherFire
Cooking the eggs
Adding salmon and shredded cheese
A delicious omelet!
And the final results?  See for yourself.  I got nice, fluffy eggs, and I gotta say, it was delicious.  And this was with a cheap little lightweight pan.  I got a little sticking, but nothing bad.  NICE!
Minor sticking occurred 
So, in summary, this is a really good cooking stove, and really good for an alcohol stove.

OK, so nice stove, but how's the weight?

On my scale, it weighs 45g/1.6oz.  Maybe a little heavy compared to something like a Trail Designs 12-10 stove at 16g/0.6oz, which is  about 1/3 the weight, but the FeatherFire's weight includes the pot supports and the little snuffer cap, features not included in the 12-10 stove, and the FeatherFire simmers.  On the other hand, compared to the 112g/4.0oz Trangia burner, the 45g/1.6oz FeatherFire seems as light as, well, a feather.

Downsides?  Well, maybe a couple, both in the durability category.  First, the pot supports are perhaps a little spindly.  I think they could become bent with use.  They're surprisingly strong, and I haven't had any problems so far, but I've been careful.  Second, will the simmering apparatus stand up to the rigors of the trail?  I can't say for sure, but there are more small parts on this stove than on other stoves.  No blatant "red flags" here, but something to bear in mind as one uses the stove.  Of course, if the band were to fail somehow, you could still use the stove as a non-adjustable chimney stove, so you wouldn't be completely stuck out on the trail.  You'd just lose some of the precise simmer control.  I haven't had the stove for long, but I actually think the simmering apparatus will be OK.  It's those pot supports I worry about.  I notice that PackaFeather has a second stove, the XL.  The XL is not an "eXtra Large" version of the FeatherFire but rather appears to be in the same class as the FeatherFire.  The XL appears to have improved pot supports of a type that will last well, so it appears that PackaFeather may be well aware of the limitations of the pot supports of a FeatherFire.  I have not had a chance to review an XL as of this writing.

One other item of note.  Sometimes a FeatherFire "burps."  What do I mean by "burp?"  Well sometimes you'll hear a pop and there will be a flash of flame.  It seems to happen most when you turn up the stove.  It doesn't seem to happen at all on fully open or fully closed.  But if you're somewhere in between, sometimes the stove just plain burps. I'm not completely sure what's causing it although I suspect vaporized alcohol is escaping out the ventilation ports, building up, and then "flashing" from the heat of the flame when sufficient build up occurs.  It doesn't seem to hurt anything although it is a little bit weird.  I found that by playing with the flame control setting, I could find "burp free" settings.

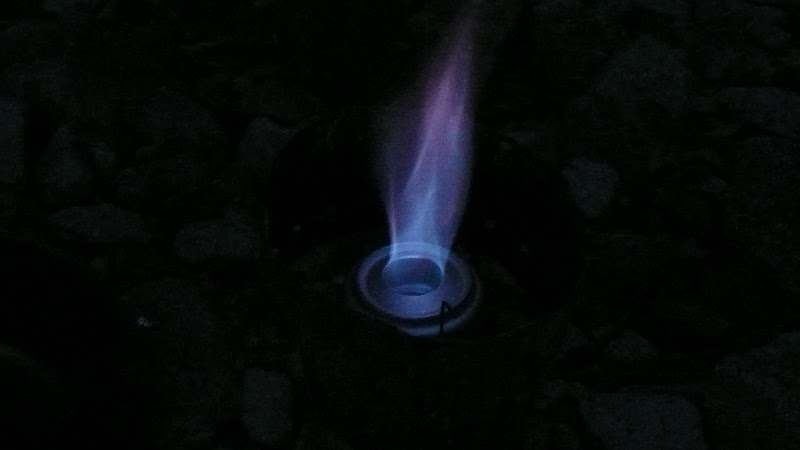
I was able to capture what the flame from a burp looks like with my camera.
The flame from a "burp" on a FeatherFire
Notice that in addition to the the primary flame arising out of the burner, there's sort of a wraith like flame just under the pot.  This is the flame from a "burp."  Like I say, odd, but it doesn't seem to hurt anything.  If it happens, just adjust the flame knob down a bit and it typically doesn't recur.

The little snuffer cap (0.07oz/2g) that comes with the FeatherFire is kind of handy.
The snuffer cap of a FeatherFire only weighs two grams!
Now, if you're just boiling water, you can pretty quickly figure out how much alcohol you need to boil, say, two cups of water.  So, in that case, you just dispense the proper amount of alcohol and let the stove burn itself out.  But with real cooking, it's a lot harder to predict how much fuel you'll need.  With the FeatherFire, don't worry about it.  When you're done cooking, close the vents on the stove and put the snuffer cap on.  The stove quickly goes out.  Hopefully you've got the excellent PackaFeather cap along with you and you can then just vacuum up the leftover fuel.  PackaFeather has put together a nice little system here.

I didn't have a PackaFeather windscreen and heat reflector to test at the time of this writing, so I cannot comment on those items.

The FeatherFire stove:  Highly Recommended except maybe for the pot supports.  Time will tell on the pot supports.

Thanks for joining me on another Adventure in Stoving,

HJ


FeatherFire Related Blog Posts
  • The FeatherFire Alcohol Stove
  • The FeatherFire With a Caldera Cone
  • (Pot) Sizing Up the FeatherFire Alcohol Stove
Read More
Posted in alcohol burner, alcohol fuel, alcohol stove, denatured alcohol, FeatherFire, HEET, methanol, PackaFeather, simmer control, simmering, simmering alcohol | No comments

Friday, 9 December 2011

The Caldera Cone's 12-10 Burner

Posted on 13:33 by Unknown
Recently, I did a review of the Caldera Cone alcohol stove system, which is a wonderfully efficient, lightweight, wind resistant alcohol stove system, one of the best out there.
A Caldera Cone alcohol stove system in use with an MSR Titan kettle.
Today, I thought I'd take a quick look at the unique burner that comes with the Caldera Cone, the 12-10 burner.  As for why the Caldera Cone is such an efficient alcohol stove system, please see The "Magic" of the Caldera Cone.
A Caldera Cone's 12-10 burner, shown here in my hand.
The 12-10 burner has an interesting and unusual design.  While the 12-10 has holes in the side of the body of the burner, it is not a side jet stove, at least not in the conventional sense.
Some common alcohol stove designs:  Open cup side burner, closed top jet, open top jet (including the brass Trangia burner)
With a typical side jet burner, the flames burn out from the jets.
A typical side jet burner.
With a 12-10 burner, the flames from the "jets" basically burn in to the burner.  It's a little hard to see, but take a close look at the two photos below of a 12-10 burner.  If you look closely, you can see the jets burning within.
A 12-10 burner in use.  Can you see the jets within the burner?
Another photo of a 12-10 burner in use.  Can you see the interior jets any better in this photo?
The interior jets combine into one flame and exit the burner, burning as though the 12-10 burner were a simple open cup type burner.  It's anything but.  This is one sophisticated, well-tuned burner.  I can only imagine how many hours of design, building, and testing went into the 12-10!
The 12-10 burner almost looks as though it were a simple open cup type burner.  Note the burner is shown mounted in a Trangia 27 set up for ease of photography. The Trangia 27 is NOT a Caldera Cone or a Trail Designs product.
Now, take a look at that photo above.  That's a really tall flame.  On most stoves, if you get a tall flame like that, the stove is really inefficient and burns through its fuel quickly.  Not the 12-10.  In test after test, I've matched it up against various designs, and relatively few stoves beat the 12-10 in a duration test.
Various alcohol stoves being compared to 12-10 burners in a duration test.  Can you spot the 12-10 burners?  They're the two on the lower right hand side, front row.

One might also think that such a tall flame would waste a lot of heat.  Not so with a Caldera Cone
A Caldera Cone (left)
That cone controls the airflow around the pot and transfers heat to the pot very efficiently with a minimum of fuel use.
Water boiling on a Caldera Cone stove system.
The Caldera Cone alcohol stove system -- it's one well thought out system. 
My Caldera Cone alcohol stove system set up.

And at it's center?  The superb, lightweight 12-10 burner.  Highly recommended.

HJ

P.S. This blog post is part of my series on the Caldera Cone. In case you missed any of the series:
  • Caldera Cone Alcohol Stove Review (on Seattle Backpackers Magazine)
  • Caldera Cone Review Supplement -- Additional Photos and Technical Appendix with Weights
  • Caldera Cone vs. Clikstand Alcohol Stove Tests
  • The Caldera Cone's 12-10 Burner
  • What "Color" is your Caldera?
  • The "Magic" of the Caldera Cone (Why is the Caldera Cone so efficient?)

A Trail Designs 12-10 alcohol burner
Related posts and articles:
  • Getting Started with Alcohol
  • DIY Alcohol Stoves -- Basic Design Considerations
  • Cold Weather Tips for Alcohol Stoves
  • Is Ethanol Worth It?
  • Caldera Cone Alcohol Stove Review (on Seattle Backpackers Magazine)
  • Caldera Cone Review Supplement -- Additional Photos and Technical Appendix with Weights
  • The Clikstand Alcohol Stove System Review
  • Caldera Cone vs. Clikstand Alcohol Stove Tests
  • Trangia 27 Alcohol Stove System Review
  • The Caldera Cone's 12-10 Burner
  • The Trangia Alcohol Burner
  • What's the Best Alcohol for Stove Fuel?
  • What Is Meths?  (And how is that different than Methanol?)
  • Going "Green" with Stoves:  Alcohol and Biodiesel


Read More
Posted in 12-10, alcohol burner, alcohol stove, caldera cone, Trail Designs | No comments

Tuesday, 1 November 2011

Getting Started on Alcohol

Posted on 12:56 by Unknown
A few of my many alcohol stoves.  L to R:  Cat food can stove (home made), Atomic stove (Mini Bull Designs), open top jet stove (home made), White Box stove (White Box Stoves), civilian Trangia (AB Trangia)
First, let me say that you're talking to a long time white gasoline user here. When I was a kid, dad had an old white gasoline two-burner "suitcase" type stove. We used a white gasoline Optimus 8R when we went backpacking. I bought my first stove, a white gasoline only Whisperlite, in 1986. For all of the 80's and 90's, that was the only stove I had.

But as with us all, increasing age has crept up on me, and carrying a big, heavy pack simply isn't an option anymore. Lately, I've been trying to find ways to lighten up my pack. One of the ways I've tried to do that is by experimenting with alcohol stoves. Let me give you an example: Remember my Whisperlite that I bought in 1986? It weighs 312g/11oz for just the pump and stove (i.e. not including the windscreen, fuel bottle, and fuel). By contrast, my 12-10 alcohol stove from Trail Designs weighs 16g/0.6oz. That's right, my alcohol stove weighs less than one ounce. A Whisperlite is nearly twenty times heavier than my 12-10 alcohol stove.  Speaking of the 12-10 stove, if you'd like to see my pick for a good ultralight alcohol set up, check out my article and post on the Caldera Cone.
The 12-10 stove (in my left hand) from Trail Designs.
Now, in all fairness, alcohol doesn't contain as much heat per gram as white gasoline. One does have to carry more alcohol to do the same amount of cooking, but given that the Whisperlite is so much heavier to start with, unless you're doing multi-week trips without resupply, an alcohol stove will almost always be lighter overall.

Alcohol stoves take a bit of getting used to. They're slower, generally have less flame control (depending on the model), and are more vulnerable to wind. To start, you might try taking an alcohol stove on day hikes.  They're light and compact; you'll hardly notice they're there. A cup of hot tea on a cool fall afternoon is a real delight I must say. Then maybe try bringing an alcohol stove on a "quick overnighter" (one night out).  After you've tried some "quick overnighters," then maybe build up to a full weekend, and then maybe a multi day trip.  In no time, you'll feel very comfortable with your alcohol stove.

When you do start experimenting with alcohol stoves, I recommend an open style.  An open style is the easiest to fuel, easiest to light, and is fairly simple to make.
An open side burner stove (left) and a closed jet stove (right)

Here's a video from renown ultra long distance hiker Andrew Skurka on how to make a simple cat can stove.


When you start working with alcohol stoves, be sure to match the stove to the pot.  Take a look at the below photo.  Notice how the flames spill up around the sides of the pot?  Those flames are wasted heat and therefore wasted fuel -- fuel that you had to carry on your back.  You want to avoid flame spillage by choosing a low wide pot rather than a tall narrow pot.  Match the pot to the flame pattern of your stove.  You want to avoid any flame spillage.
This pot is too narrow.  Note how heat is being wasted up the sides.

Be sure to use a windscreen. The flames from a non-pressurized alcohol stove have a pretty low flame velocity.  Wind will play hob with your cooking if you don't have a windscreen.  If you've already got a liquid fueled stove, the windscreen from your liquid fueled stove should work fine. If you don't have a windscreen, check out my article and blog post on windscreens.  In particular look at the multi-layered aluminum foil windscreen I made.  For an alcohol stove, you won't need one that is as tall as the one I made for my canister stove, but the principle is the same.

A tip as you experiment with various types of alcohol stoves:  A slow stove is typically a more efficient stove.  Stoves that heat water more quickly usually burn through more alcohol -- alcohol that you just hauled all the way up and over that high pass.  Get a slower, more efficient stove, and you can make your fuel stretch a bit longer.  Alcohol is about lightness and efficiency.  If you're looking for fast boil times, you might want to look at gas or petroleum based liquid fueled stoves.

For beginners, I wouldn't recommend bringing an alcohol stove if:
  • You're cooking for multiple people (too slow)
  • You're melting snow (not enough power)
  • You're cooking a complicated menu (not enough flame control typically)
  • You're headed out in weather near, at, or below freezing (alcohol doesn't vaporize well in cold weather)

Set up on an alcohol stove is a breeze. There's typically no pumping or priming. Just pour in some fuel, light, and go. There's no heavy steel canister with delicate threads that could be cross-threaded as with a gas stove. There's no pump that could break or seals that could fail as with a petroleum based liquid fueled stove. And it's QUIET.

Try it; I think you'll like it.

HJ

Related posts and articles:
  • Getting Started with Alcohol
  • DIY Alcohol Stoves -- Basic Design Considerations
  • Cold Weather Tips for Alcohol Stoves
  • Is Ethanol Worth It?
  • Caldera Cone Alcohol Stove Review (on Seattle Backpackers Magazine)
  • Caldera Cone Review Supplement -- Additional Photos and Technical Appendix with Weights
  • The Clikstand Alcohol Stove System Review
  • Caldera Cone vs. Clikstand Alcohol Stove Tests
  • Trangia 27 Alcohol Stove System Review
  • The Caldera Cone's 12-10 Burner
  • The Trangia Alcohol Burner
  • What's the Best Alcohol for Stove Fuel?
  • What Is Meths?  (And how is that different than Methanol?)
  • Going "Green" with Stoves:  Alcohol and Biodiesel
A classic, old Trangia 25 alcohol burner.  Extremely windproof.
Read More
Posted in alcohol burner, alcohol fuel, alcohol stove, beginner stove, caldera cone, cat can stove, getting started, mini bull, minibull, open jet stove, Trangia | No comments

Wednesday, 12 October 2011

The Clikstand (alcohol) -- A Brief Introduction

Posted on 21:21 by Unknown
I recently featured some tests of the Clikstand with Trangia burner.  For my general thoughts about the Clikstand stove system, I suggest you check out that link.

In this post, I thought I'd show the Clikstand with Trangia burner in a little more detail, and I thought I'd show you my typical day hike configuration.  My overnight hike configuration is the same, only I'd carry more fuel.

First, a pot of about 1000ml in capacity with "traditional" proportions (wide not narrow, short not tall) works well with the Clikstand.   Smaller pots don't fit well with the span of the Clikstand.  I tried a 780ml Snow Peak pot and an 850ml MSR Titan kettle on the Clikstand, and neither was very stable.  See the Clikstand compatibility information at the bottom of this post for more details.The other big advantage of a pot of about 1000ml size is that all of the of the components will nest inside the pot (Clikstand, burner, small fuel bottle, lighter, spoon,windscreen, and fuel measuring cup).
A 1000ml Snow Peak pot containing all the components necessary to operate a Clikstand/Trangia combination.
The same set up as above with the pot lid removed so that you can see the contents.
The Clikstand is quite compact in terms of stowage.  To better appreciate just how complete the set is, let's take a look at all the components spread out.
All of the components of my Clikstand/Trangia set up on display
Now, let's take a little closer look at the central components.  Note the roughly triangluar piece with the circular cut out.  This will form a "deck" and hold the burner.  The burner can be seen just above the upper point of the triangular shaped "deck".
The central components of my Clikstand/Trangia set up.
Top row, L to R:  fuel bottle, Trangia burner, lighter
Middle Row, L to R:  fuel measuring cup, Clikstand "deck", telescoping spoon
Bottom row:  the Clikstand's "walls"

Let's take a closer look at the Clikstand's "walls."  Note the tab on the left side of each piece, the slot on the right side, the "hooks" to the right of the slot, and the projection on the top of each piece.   The slot and tab connect the walls.  The hooks hold the windscreen.  The projection supports the cook pot.
The three identical stamped pieces of stainless steel that form the walls of the Clikstand burner stand/pot support
The Clikstand is first formed from the three identical pieces of stamped stainless steel (there is a titanium version as well; see below).  The tab from one piece is fitted to the slot in the next until all three pieces are connected, forming a triangle.

A fourth piece, the "deck" that you saw in earlier photos (roughly triangular in shape, with a cut out for the burner) is then fitted within the triangle.  The deck "clicks" into place when inserted properly, hence the name "Clikstand."
The three identical pieces form the "walls" and the fourth piece is emplaced as a "deck" within the walls.
The Trangia burner is then placed into the cutout in the center of the deck.  A windscreen is then placed onto the "hooks" that extend from the slotted end of each of the wall pieces.  Note:  The windscreen shown is not a Clikstand windscreen.  The windscreen is a BPL titanium windscreen.  The Clikstand I bought was used and did not include a windscreen, so I included one of my own.
Clikstand with Trangia burner and windscreen in place.
A pot is then of course placed on the assembled burner and stand.
A Clikstand with a 1000ml Snow Peak pot in place.
The regular stainless steel Clikstand with brass Trangia burner isn't the lightest set up out there (see my thoughts on the titanium Clikstand below).  Indeed, many will argue that a small upright gas stove will be as light or lighter, even when you factor in the weight of the steel canister that a gas stove requires.  True, but the Clikstand has a several advantages over a gas stove: 
1.  Windproofness.  Upright gas stoves are typically quite vulnerable to wind.  The Clikstand functions very well in wind (although its fuel consumption will typically go up)
2.  Foolproofness.  The Clikstand has almost nothing to go wrong on it.  There is no delicate thread that you might cross thread.  There are no "O" rings or gaskets to crack or dry out (well except for the one in lid of the Trangia burner, but that gasket does not affect the operation of the stove).  There is no tiny, single jet to clog.  There is no Lindal valve to get stuck open (It happens!  Ask me how I know!).
3.  Fuel availability.  To get a gas canister, you generally have to go to a specialty shop.  Alcohol, at least in the US, is far more available.  Stove appropriate alcohol is available at gas stations, hardware stores, cleaning supply stores, paint stores, and even some grocery stores and pharmacies.  Availability is particularly important when traveling by air and you don't want to burn a day gathering supplies.  Who wants to drive around looking for a specialty store when you could just grab some alcohol from the first hardware store you pass?  For information on what alcohols are appropriate for stove use, see my post on Alcohol as a Stove Fuel.
4. Alternative fuels.  Not only is alcohol fuel widely available, the Clikstand can run on alternative fuels.
  • One alternate fuel is hexamine, which is commonly sold under the brand name ESBIT.  Hexamine is  a little smelly and leaves a residue on the bottom of your pot, but it is very light and convenient.  You'd have to rig something up in the cut out of the deck of the Clikstand, but that shouldn't be too hard.
  • Another alternate fuel is wood.  Yes, you heard me right, wood.  The Clikstand is either stainless steel or titanium, both of which will withstand heat quite well.  You can pile small sticks and such in the body of the Clikstand and burn them.  You will of course blacken the pot, stand, and windscreen in the process, but there are times where having an alternative fuel source like wood (which is often available where there are no stores or points of resupply!) could come in really handy.  Note:  As of this writing, I have not tried my Clikstand on wood.
5.  Silent operation.  Don't underestimate the value of silence.  I love to be able to hear the natural world that surrounds me when I'm out in the wilderness.  Experience the Zen of an alcohol stove!

COMPARING THE COST AND WEIGHT OF TITANIUM vs. STAINLESS STEEL
(All prices in USD)

Steel (g) Ti (g) Weight Savings
(g)
Conversion Factor Savings (ounces) Steel Price Ti Price Price Difference Cost per gram
saved
Cost per ounce
saved
Stand 94 57 37 0.035 1.3 $29.95 $59.95 $30.00 $0.81 $22.99
Screen 37 20 17 0.035 0.6 $14.95 $19.95 $5.00 $0.29 $8.34
Subtotal 131 77 54 0.035 1.9 $44.90 $79.90 $35.00 $0.65 $18.37
Burner 111 34 77 0.035 2.7 $15.95 $45.95 $30.00 $0.39 $11.05
Total 242 111 131 0.035 4.6 $60.85 $125.85 $65.00 $0.50 $14.07

MY THOUGHTS ON THE TITANIUM VERSION OF THE CLIKSTAND
The difference in weight between a Ti Clikstand and windscreen and a stainless steel (SS) Clikstand and windscreen is 54g (about 2oz), for which you will pay an additional $35.00.  $35.00 is a bit much to pay for two ounces in weight savings, although it may be worth it for some.

The argument for going with the titanium version is more compelling if you get everything Ti (stand, screen, and Evernew burner). If you get everything Ti, you would save 131g (4.6 oz) -- which is over a quarter of a pound. But, to do this, you must pay an additional $65.00 over the price of the standard SS and brass components. In other words, the price more than doubles if one gets all Ti components. For $125.85 I can get a very nice petroleum based liquid fuel or gas stove. $125.85 is simply too much for an alcohol stove. One would really have to be an alcohol stove aficionado in order to pay that kind of money.  Note:  One could save some money if one were to by the components as a set.  Still, even as a set, the titanium components cost significantly more than the conventional SS and brass components.

Add to that the fact that there is no lid or simmer ring on the Ti version of the burner, both of which are very nice features of the Trangia burner. Moreover, the Evernew Ti burner is generally less efficient (but faster) than the Trangia burner according to the tests that I've seen.  A less efficient burner means that you will have to carry additional fuel, thus eroding at least some of the weight savings that you just paid so dearly for.

I'd love to try a Ti set up, but for those prices?  I can't quite justify it just yet.

VIDEO COMPARISON TITANIUM vs. STAINLESS STEEL
The following video was made by Hendrik who is from Finland. The video compares a titanium Clikstand set up (including the Evernew titanium burner) with a stainless steel Clikstand set up with a conventional brass Trangia burner.  You can view Hendrik's interesting and informative hiking and lightweight backpacking blog, Hiking In Finland.  The blog is in English and includes a lot more than just information pertaining to Finland.


There you have it, a very brief introduction to the Clikstand.

HJ

Appendix

CLIKSTAND COMPATIBILITY INFORMATION (Copied from Clikstand.com)
Pot Compatibility:
Minimum pot size 4.2” (106 mm) diameter or larger. Maximum recommended pot size 8.0” (203 mm) diameter. For pots, cups or kettles smaller than 4.2” (106 mm) diameter click here (Note this link leaves my blog and goes to the Clikstand site).

Windscreen Compatibility:
Maximum pot size 5.9” (150 mm) diameter.

Burner Compatibility:
Maximum burner diameter 2.75” (70 mm), maximum burner height 2.5” (64 mm).

Pot Size Required for Storage:
Minimum pot size required to store Clikstand, windscreen, and burner inside 5.2” (132mm) diameter, 2.8” (71mm) height.
Related posts and articles:
  • Getting Started with Alcohol
  • DIY Alcohol Stoves -- Basic Design Considerations
  • Cold Weather Tips for Alcohol Stoves
  • Is Ethanol Worth It?
  • Caldera Cone Alcohol Stove Review (on Seattle Backpackers Magazine)
  • Caldera Cone Review Supplement -- Additional Photos and Technical Appendix with Weights
  • The Clikstand Alcohol Stove System Review
  • Caldera Cone vs. Clikstand Alcohol Stove Tests
  • Trangia 27 Alcohol Stove System Review
  • The Caldera Cone's 12-10 Burner
  • The Trangia Alcohol Burner
  • What's the Best Alcohol for Stove Fuel?
  • What Is Meths?  (And how is that different than Methanol?)
  • Going "Green" with Stoves:  Alcohol and Biodiesel

Disclaimer:  I am in no way affiliated with Clikstand.com nor do I have any financial interest in any product displayed on this page.  I am merely a satisfied customer sharing his experience.
Read More
Posted in alcohol burner, alcohol fuel, alcohol stove, Clikstand, denatured alcohol, Evernew, titanium, Trangia | No comments
Older Posts Home
Subscribe to: Posts (Atom)

Popular Posts

  • The Kovea LPG (Propane) Adapter
    I recently picked something up that turns out to be pretty useful:  A Kovea LPG (Propane) Adapter.  This adapter allows one to run a standar...
  • Stove of the Week: MSR Whisperlite Universal
    As previously announced and reported here on Adventures in Stoving, MSR is coming out with a new version of their Whisperlite stove, the W...
  • The SuperGnat (Gaz *and* Threaded!)
    There are two types of modern gas canisters for backpacking (see  Backpacking Gas Canisters 101 ). Generally, stoves built for one type of c...
  • Refilling Coleman PowerMax Canisters
    It's no secret that I like Coleman PowerMax gas canisters.  Note:  PowerMax canisters are called  just plain "Max" in some loc...
  • Stove of the Week: MSR Rapidfire
    OK, so this week's stove is a bit of a "sleeper" in the sense that it's not a stove that you would expect a lot from -- un...
  • Stove of the Week: The Caldera Cone
    This week's stove is the Caldera Cone with 12-10 stove from Trail Designs . My review of the stove is available at Seattle Backpackers M...
  • Stove of the Week: Primus Omnifuel
    If you want a stove that runs like a Swiss watch, then the Primus Omnifuel is your stove. It's precision engineering at it's best.  ...
  • Stove of the Week: Hank Roberts Mini Stove, Mark III
    I happen to like my old Hank Roberts stove, a stove that dates back to the 1960's. It's in very nice condition. I have the Mark I...
  • The Soto Muka Stove (OD-1NP) -- Review Supplement
    Soto has recently put out the powerful yet quiet Muka gasoline stove (OD-1NP). The Soto Muka stove (OD-1NP) in operation. The Soto Muka is a...
  • 100% Propane for Backpacking? YES!
    What's the "holy grail" of canister gas for cold weather backpacking?  100% propane.  Propane is the best.  Plain butane won...

Categories

  • 100% propane
  • 12-10
  • 12-10 burner
  • 2012
  • adapter
  • alcohol burner
  • alcohol fuel
  • alcohol stove
  • all fuel
  • all fuel stove
  • Appalachian Trail
  • AT
  • back country
  • backpacker
  • backpacking
  • backpacking canister
  • backpacking espresso
  • backpacking fuel
  • backpacking fuel prices
  • backpacking stove
  • beginner stove
  • best alcohol
  • best gas cold
  • best gas cold weather
  • best stove
  • blended fuel
  • blog status
  • boil
  • borde benzin brenner
  • borde bomb
  • borde stove
  • BPL
  • BPL Firelite
  • BPL Firelite 550
  • Bush Buddy
  • Bush Buddy Ultra
  • bushbuddy
  • bushbuddy ultra
  • butane
  • butane adapter
  • butane refill
  • butane stove
  • Caldera
  • Caldera Caddy
  • caldera cone
  • Caldera Cone Ti-Tri
  • Caldera Inferno
  • California Campfire Permit
  • Camp 5
  • camping
  • Camping Gaz
  • canister
  • canister cold
  • canister explosion
  • canister formats
  • canister gas
  • canister gas cold
  • canister refilling
  • canister stove
  • canisters
  • cartridge refill
  • cartridge stove
  • cat can stove
  • Cheap Deals
  • cleaning wood soot
  • Clikstand
  • cold
  • cold weather
  • cold weather gas
  • Coleman
  • coleman fuel
  • Coleman Max
  • Coleman PowerMax
  • Coleman Xpedition
  • Coleman Xpert
  • Coleman Xtreme
  • Crux
  • denatured alcohol
  • disk stove
  • EFI
  • Esbit
  • Espresso Star
  • ethanol
  • ethyl
  • Evernew
  • expedition
  • extreme cold
  • fast boil times
  • FeatherFire
  • fuel
  • fuel cube
  • fuel gauge
  • fuel price
  • fuel prices
  • fuel quantity
  • fuel tablet
  • gas
  • gas cartridge
  • gas cold weather
  • gas explosion
  • gas formats
  • gas gauge
  • gas refill
  • Gas stove
  • Gaz
  • gear
  • gear review
  • Gerry Stove
  • getting started
  • GigaPower
  • Gnat
  • GS-100
  • Hank Roberts
  • Hank Roberts Mini Mark III
  • Hank Roberts Mini Stove
  • heat exchanger
  • heat shield
  • HEET
  • hexamine
  • hexie
  • hiking
  • hybrid stove
  • Inferno option
  • integrated canister stove
  • Internationale
  • inverted canister
  • inverted gas
  • isobutane stove
  • JetBoil
  • JetBoil Cooking
  • JetBoil danger
  • JetBoil failure
  • Jetboil fry pan
  • JetBoil melt
  • Jetboil omelet
  • Jetboil omelette
  • Jetboil pan
  • JetBoil problem
  • JetBoil Sol
  • JetBoil Sol Ti
  • jetboil Sumo
  • KB-1006
  • kerosene
  • Kovea
  • Kovea Camp 4
  • Kovea Camp 5
  • Kovea Moonwalker
  • lighter
  • liquid feed
  • liquid feed gas
  • liquid fuel
  • Mark III
  • Max
  • melted heat exchanger
  • methanol
  • metho
  • metho stove
  • meths
  • meths stove
  • methyl
  • methylated spirits
  • micro regulator
  • micro rocket
  • microregulator
  • microrocket
  • mini bull
  • Mini Bull Designs
  • Mini Mark III
  • Mini Stove
  • minibull
  • Monotauk
  • Monotauk Gnat
  • Moonwalker
  • MSR
  • MSR canister
  • MSR Espresso Star
  • MSR micro rocket
  • MSR microrocket
  • MSR pocket rocket
  • MSR pocketrocket
  • MSR Rapidfire
  • msr reactor
  • MSR Simmerlite
  • MSR super fuel
  • MSR SuperFly
  • MSR Titan kettle
  • MSR Whisperlite
  • MSR whisperlite universal
  • MSR Windpro
  • MSR Windpro II
  • msr xgk
  • muka
  • muka od1-np
  • muka od1np
  • muka stove
  • Muka ストーブ
  • multi fuel
  • multifuel
  • n-butane
  • new
  • Nion 3
  • Nova
  • od-1np
  • od-1R
  • od1np
  • od1r
  • Omni Fuel
  • Omnifuel
  • open jet stove
  • Optimus
  • Optimus Crux
  • Optimus Nova
  • pack stove
  • PackaFeather
  • petrol
  • petrol stove
  • piezo
  • piezoelectric
  • pocket rocket
  • pocketrocket
  • pots
  • Powermax
  • PowerMax refilling
  • practical
  • pre shaker jet
  • pre-heat loop
  • pre-Katadyn
  • price
  • Primus
  • Primus Omnifuel
  • propane
  • propane adapter
  • propane backpacking
  • propane stove
  • radiation shield
  • Rapidfire
  • reactor
  • refill canister
  • refilling backpacking
  • refilling butane
  • remote canister
  • remote gas
  • review
  • side laying canister
  • simmer control
  • simmering
  • simmering alcohol
  • Simmerlite
  • snow melting
  • Snow Peak
  • SOD-300
  • SOD-371
  • SOD300
  • SOD371
  • Sol
  • Sol Ti
  • solid fuel
  • soto
  • soto microregulator
  • soto muka
  • soto od-1R
  • soto od1-np
  • soto od1np
  • Soto pocket torch
  • stove
  • stove fuel
  • stove review
  • super fuel
  • SuperFly
  • superfuel
  • SuperGnat
  • threaded canisters
  • ti wing
  • Ti-Tri
  • Tibetan Ti Wing Stove
  • tips
  • Titan kettle
  • titanium
  • top mount canister stove
  • top mounted canister stove
  • Trail Designs
  • Trangia
  • two burner
  • ultralight
  • Universal gas
  • unsafe
  • upright canister stove
  • warning
  • whisperlite
  • whisperlite universal
  • white gas
  • white gas stove
  • white gasoline
  • wind
  • Windpro
  • Windpro II
  • windscreen
  • windscreens
  • wood burner
  • wood cooking clean up
  • wood gas
  • wood gasification
  • wood stove
  • XGK
  • xgk ii
  • Xpedition
  • ボルドーバーナー

Blog Archive

  • ▼  2013 (18)
    • ▼  May (2)
      • Fire Safety -- Alcohol vs. ESBIT?
      • Blog Status, 1 May 2013
    • ►  April (5)
    • ►  March (6)
    • ►  February (5)
  • ►  2012 (54)
    • ►  September (2)
    • ►  June (3)
    • ►  April (5)
    • ►  March (12)
    • ►  February (13)
    • ►  January (19)
  • ►  2011 (65)
    • ►  December (15)
    • ►  November (13)
    • ►  October (7)
    • ►  September (3)
    • ►  August (5)
    • ►  July (2)
    • ►  June (3)
    • ►  May (2)
    • ►  April (1)
    • ►  March (5)
    • ►  February (5)
    • ►  January (4)
Powered by Blogger.

About Me

Unknown
View my complete profile