Firelite Tech Support

  • Subscribe to our RSS feed.
  • Twitter
  • StumbleUpon
  • Reddit
  • Facebook
  • Digg
Showing posts with label Caldera Inferno. Show all posts

Friday, 9 March 2012

BushBuddy vs Ti-Tri Cone

Posted on 14:50 by Unknown
Recently, I reviewed the Ti-Tri Cone and the BushBuddy Ultra.  Today, I thought I'd do a quick comparison of the two.

A Ti Tri Cone (Sidewinder type), left, and a BushBuddy Ultra, right. 
First, let me say right up front, that these are two really good quality wood burning stoves.  They're both well designed, well constructed, and a pleasure to use.  If you're in the market for a wood burning backpacking stove, I have no problem commending either one to you.  However, as with all stoves, one or the other will work better for a given individual, depending on that individual's situation and style.  So, let's compare!

Quality of Workmanship
Both have excellent build quality, but the BushBuddy Ultra is a tour de force in craftsmanship.  It is just really well put together by someone who clearly is a master fabricator.    I used this photo in my review, but it's so illustrative that it bears repeating.
The wonderful craftsmanship of a BushBuddy Ultra
Just look at the regularity of the spot welds.  My information is that those are all done by hand (!).  Now, that's craftsmanship.  Of course we're here to burn wood not put something up on the mantle as an art piece, but still, one can't help but admire the workmanship of the BushBuddy Ultra.

Note that the BushBuddy's craftsmanship in no wise puts the Ti-Tri Cone in a bad light.  The Ti-Tri Cone is a well made product.

Packability
The Ti-Tri Cone has a clear edge here.  The main cone, inferno option inner cone, and floor roll up into a little package.  Now, that's pretty sweet.
The main cone, inner cone ("Inferno Option"), and the floor.
The fire grate fits on the floor of the pot; the two tent stakes fit inside the rolled up cone; the wire support for the grate rolls up and stores next to the rolled up cone; and there's still room inside for more.  I can toss in a lighter, measuring cup, alcohol stove, spoon, a couple of ESBIT cubes, etc.
A packed up Ti-Tri Cone (left).  A packed up BushBuddy (right).
By contrast, a BushBuddy in the pot means you generally won't get too much else in the pot.  Now, don't get me wrong.  The BushBuddy's trick of simply rotating the pot supports 180 degrees and storing them within the body of the BushBuddy is brilliant, but the BushBuddy just isn't as compact as a Tri-Ti Cone.
The BushBuddy's pot supports rotate 180 degrees and store inside.
You can fit an alcohol stove or some ESBIT inside, but the BushBuddy isn't quite as space efficient as a Sidewinder Ti-Tri Cone.

Ease of Set Up
The BushBuddy is a snap.  Pull out the pot supports, rotate 180 degrees so that the pot supports point up, and set the pot supports in the grove that runs along the top of the BushBuddy.  You're done.  It might take all of about 30 seconds, if that.  On the other hand, the Ti-Tri Cone has an outer cone to assemble, the floor to emplace, the wire roll to position, the grate to set atop the wire roll, the inner cone must be connected, and the two tent stakes must be slid through their respective holes,  Clearly the BushBuddy is the winner here.

However, we're talking about a wood fire here.  Compared to gathering wood, building a fire lay, and getting a fire started, I don't think either set up is particularly bad.  In the context of the amount of work that a wood fire requires, the set up on either one is not a big deal.

Ease of Take Down
As you might expect, it's more work to pack up a Ti-Tri Cone with the Inferno Option.  I don't think it's a huge hassle, especially after you've done it a couple of times, but it is more work.  The one thing I do notice is that my hands get dirtier when taking down a Ti-Tri Cone after wood burning.  I guess one just needs to be prepared for that and pack some baby wipes.

Ease of Cooking
The real difference here is capacity.  Even though the Ti-Tri Cone packs smaller, it sets up larger.  The larger capacity means you load once for a boil.
The Ti-Tri Cone (left) has a much larger fire box than the BushBuddy (right).
The smaller BushBuddy needed to be fed repeatedly while in use in order to get a boil.  If you're wanting to do cooking that requires coals for even heating, the Ti-Tri Cone holds more coals and provides more sustained, even heat.  I've been able to prepare things like a four egg omelet, which is pretty thick when cooked in a small backpacking type pan, without any problems on a wood-fired Ti-Tri Cone.
An omelet prepared on a wood-fired Sidewinder Ti-Tri Cone
Non-Wood Use
OK, here's where the Ti-Tri Cone just plain beats the BushBuddy.  Yes, you can kludge up a way to run an alcohol or ESBIT stove with a BushBuddy, but it really doesn't work that well, particularly in wind.
An alcohol stove in use with a BushBuddy.  It works.  Kind of.
On the other hand, the Ti-Tri Cone is an alcohol stove set up of the first order.  The Ti-Tri Cone is also an excellent ESBIT set up.  Really it is excellence in non-wood mode that sets the Ti-Tri Cone apart.  The BushBuddy is great if you're going to be able to burn wood a high percentage of the time and only occasionally have to burn alcohol or ESBIT.  If however you're going to do any significant portion of a trip with non-wood fuels, the Ti-Tri Cone wins hands down.

Wind Resistance
The Ti-Tri Cone system uses the highly effective Caldera Cone as its pot support and windscreen.  Except for the handle cut out, the pot has no gap between itself and the upper edge of the windcreen.
The tight fitting Caldera Cone windsreen.  
On the other hand, the BushBuddy has a 360 degree gap that allows wind to sweep through.
There is a gap that wind can blow through between the pot and the stove with a BushBuddy Ultra.
With wood, efficiency is a little less critical since if the wind blows away your heat you can presumably just add some more wood to make up the difference.  In higher winds, a stove without good wind resistance can be a problem.

If one is using alcohol or ESBIT, then wind resistance is quite a bit more critical.  The Ti-Tri Cone is the clear winner in the wind resistance category.

Weight
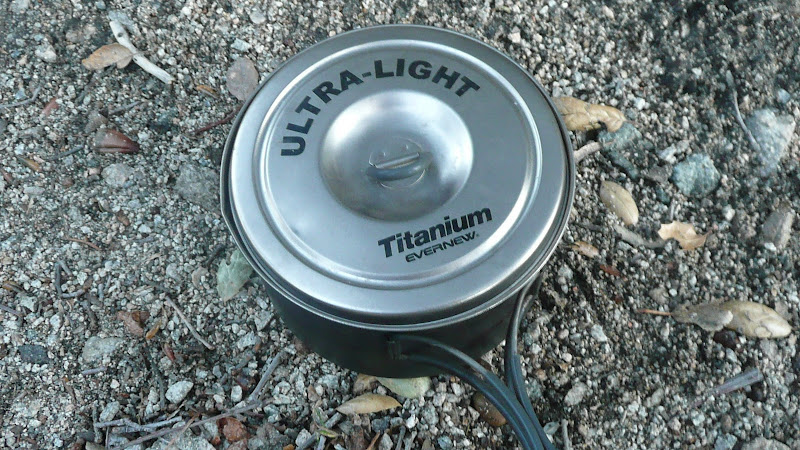
Just below, I've put down the weights corresponding to the various modes that one could run a Ti-Tri Cone in.  These weights are measured on my kitchen gram scale.  Note that I'm using a Ti-Tri Cone sized for a 1300ml Evernew pot which does not need stakes when used with alcohol.  Smaller pots will require the use of stakes.  Each stake weighs 7g.

Ti-Tri Cone   Grams  Ounces
Full Wood Mode (Inferno Option) 126 4.44
Minimum Wood Mode (with floor) 77 2.72
Non-LNT Wood Mode (no floor) 59 2.08
Alcohol Mode (no stakes) 60 2.12
ESBIT Mode (with stakes) 57 2.01

By contrast, the BushBuddy weighs 139g/4.9 ounces on my scale.  No matter what configuration in which the Ti-Tri Cone is used, the Ti-Tri Cone is lighter.

Keep in mind also that you'll need a windscreen for the BushBuddy if you use alcohol or ESBIT.  The weight of a windscreen will add weight to the above listed weight.

Pot Stability
Both stoves provide good pot stability.  I'd say the edge goes to the Ti-Tri Cone, particularly in sloping or uneven terrain.
Two Evernew 1300ml pots on (left) a Sidewinder Ti-Tri Cone and (right) a BushBuddy Ultra.  The Ti-Tri Cone is more stable in varied terrain.
Price
The Bushbuddy Ultra is $120.00 Canadian Dollars including shipping to addresses within Canada and $128.00 Canadian Dollars including shipping to the United States including Alaska and Hawaii.  No pot is included.

The price of a Sidewinder Ti-Tri Cone will vary with the options you select.  For the full wood burning set up listed below, the price is $130.00 US dollars which does not include shipping.  No pot is included, but a 20% discount is offered if you buy a pot along with the Ti-Tri Cone.  Shipping to my location is $6.37 for the below listed components.  Shipping to your location may vary.  California residents must pay sales tax which I believe is 7.6% in the county where Trail Designs is located.

The BushBuddy is slightly less and includes shipping but the Ti-Tri Cone set up includes more, and Trail Designs offers a 20% discount if you buy a pot for your set. Take your pick.

Sidewinder Ti-Tri Cone Component List
a)  Sidewinder Ti-Tri Cone (outer cone)
b)  Two titanium tent stakes
c)  12-10 alcohol stove
d)  "Gram Cracker" ESBIT stove with drip plate
e)  Inferno insert (inner cone)
f)  Fire grate and wire support
g)  Floor
h)  Tyvek sacks to house the various components.
i)  Fuel bottle (for alcohol)
j)  Small measuring cup (for measuring alcohol)

LNT Considerations
I have experienced some scorching of the ground after using the Ti-Tri Cone for an extended period of time (long periods of testing with multiple items cooked in a row) despite using the floor.  I have not experienced scorching with normal use.
Superficial scorch mark left on the ground by a Ti-Tri Cone
The scorch marks are very shallow and easily removed, but one should clear the ground before use and inspect the ground after use.

I have experienced no scorch marks when using a BushBuddy Ultra.  Indeed, the bottom of a BushBuddy doesn't even get hot while in use.

It's also worth mentioning that with either stove, fuel consumption is far less than with an open fire.  Using less fuel means that there is less impact on the environment.

Flexibility
Here, the BushBuddy wins, no question about it.  With the BushBuddy, you can use pretty much any pot, kettle, or pan.
A BushBuddy Ultra with a 1300ml Evernew pot
The same BushBuddy with a 1000ml Snow Peak pot
Note however that if you want to pack the BushBuddy in your pot that you'll need a relatively tall pot.  A BushBuddy will not fit in a shorter pot.  The BushBuddy Ultra is sized to fit well in a Snow Peak Trek 900 pot.
A BushBuddy Ultra will not fit in, for example, an Evernew 1300ml pot.  A taller pot is needed.
With a Ti-Tri Cone, you are generally restricted to whatever pot the Cone was built for.  Each Ti-Tri Cone is sized for a particular pot.  The Ti-Tri Cone seen here is sized for a 1300ml Evernew pot.  However, I have been able to balance a pan on top of the edges of the cone.  In other words, I actually have a few more options than just the pot the Ti-Tri Cone was made for.
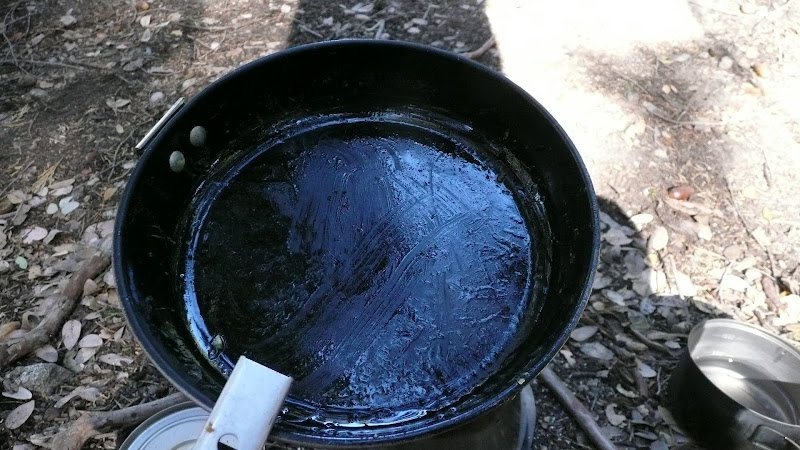
Cooking scrambled eggs in a pan placed on top of a Ti-Tri Cone
Note:  I would not try cooking with a pan placed on top of an aluminum Caldera Cone.

Conclusion
Overall, I prefer the Ti-Tri Cone because of it's lighter weight, greater capacity, better packability, wind resistance, better stability, and ability to run equally well on wood and non-wood fuels.  Particularly where I live where wood fire bans are a fact of life, the ability to run equally well on wood and non-wood fuels is key.

Moreover, I would think that for anyone who camps both above and below tree line that the Ti-Tri Cone would be the wood burning stove of choice.

So, there you have it, a quick look at the BushBuddy Ultra and the Ti-Tri Cone in terms of how they compare to one another.

I thank you for joining me on another Adventure In Stoving.

HJ

Acknowledgments
The two stoves featured in this comparison were provided by BPL members Christian D. and Randy N.  Thank you to Christian and Randy!

Other wood fired backpacking stove posts:
  • The BushBuddy Ultra.  Craftsmanship has not gone out of style.
  • The Ti-Tri Cone -- The Ultimate Ultralight Stove System?
  • Why a Wood Stove?  More Thoughts on the Ti-Tri Cone.
  • Wood Fired Cooking on a Ti-Tri Cone.  Cooking real food with wood.
  • BushBuddy vs Ti-Tri Cone.  Wood stoves, compared.

Posts on the Caldera Cone:
  • Caldera Cone Alcohol Stove Review (on Seattle Backpackers Magazine) 
  • Caldera Cone Review Supplement -- Additional Photos and Technical Appendix with Weights 
  • Caldera Cone vs. Clikstand Alcohol Stove Tests 
  • The Caldera Cone's 12-10 Burner 
  • What "Color" is your Caldera? 
  • The "Magic" of the Caldera Cone (Why is the Caldera Cone so efficient?)
Read More
Posted in Bush Buddy, Bush Buddy Ultra, bushbuddy, bushbuddy ultra, caldera cone, Caldera Cone Ti-Tri, Caldera Inferno, Inferno option, Ti-Tri, wood burner, wood gas, wood gasification, wood stove | No comments

Sunday, 26 February 2012

Wood Fired Cooking II

Posted on 17:09 by Unknown
In my last post on wood fired cooking, I cooked scrambled eggs and eggs over easy.  Well, scrambled eggs aren't exactly the trickiest dish to cook.  Don't get me wrong, I was very pleased to be able to cook scrambled eggs so easily on a wood fire.  Wood fired cooking on a Ti-Tri Caldera Cone is as easy as pie compared to cooking on an open fire.  But I thought I could do more.

Well, how about an omelet?  And not just any omelet, but a four egg omelet in a fairly small pan.   And why might the number of eggs matter?  Well, more eggs, means more thickness.  To get the eggs to cook evenly all the way through, I'm going to have to have the temperature pretty dialed in.  Not so easy, but let's give it a whirl.

So, once again, I let the wood burn down to mostly coals.  I put in my eggs, a little salmon, and some shredded cheese.  How did it go?

Actually, it went pretty darned well.
A four egg salmon and cheese omelet prepared on a wood-fired Ti-Tri Caldera Cone stove.
I was out on a two day back pack here in Henry Coe State Park, so the salmon was canned not fresh, but still, the omelet turned out fairly well.  The eggs were cooked but not burnt, the salmon was hot the whole way through, and the cheese was fully melted.

Best of all, take a look at the pan I used (far left in the below photo).
No sticking or burnt spots occurred when cooking the four egg omelet. 
No sticking and no burnt spots.  Nice!  And this was just a little cheap lightweight non-stick aluminum backpacking type pan.  No fancy cookware here; just some very basic stuff.

If I can properly cook a thick omelet without sticking or burning, then I think there are relatively few restrictions as to what one can cook on a wood-fired Ti-Tri Caldera Cone.  The more I use one, the more I like the Ti-Tri Caldera Cone.  The Ti-Tri Caldera Cone is fast becoming my #1 favorite stove.  For a guy with as many stoves as I've got, that's really saying something.

I thank you for joining me on another Adventure in Stoving,

HJ
Read More
Posted in Caldera, caldera cone, Caldera Cone Ti-Tri, Caldera Inferno, wood burner, wood gas, wood gasification | No comments

Sunday, 5 February 2012

Wood Fired Cooking on a Caldera Cone

Posted on 22:11 by Unknown
It can be tough to do real cooking on a wood fire in the backcountry.  Sure, there are guys who can do it, but it's not all that easy, even for the experienced.  Is there a way we can make cooking on a wood fire a little more accessible?  As a matter of fact, there is:  A wood burning stove.

If you've been following my blog, you know I've been evaluating a Sidewinder version of the Ti-Tri Caldera Cone.

Other blog posts on the Ti-Tri Caldera Cone:
  • The Ti-Tri Caldera Cone -- The Ultimate Ultralight Stove System?
  • Why a Wood Stove?  More Thoughts on the Caldera Cone Ti-Tri.

As I've used the titanium version of the Caldera Cone, I've become convinced that this would be a comparatively easy way to cook real food on a wood fire.   So I thought I'd try it out.  

For today's hike, I took the beautiful Kenyon Devore Trail from Mount Wilson.
The Kenyon Devore Trail
It's a really beautiful area, maybe an hour's drive from downtown Los Angeles.
The forest as seen from the Kenyon Devore Trail
Beautiful, until you descend a little farther and get into the burn zone from the 2009 Station Fire, the largest fire in the history of Los Angeles County.  The fire was human in origin.
The Kenyon Devore Trail passes through the burn zone from the 2009 Station Fire
The Station Fire burned an area of about 251 square mi/650 square km in size.  How big is 251 square mi/650 square km?  Well, Washington, DC, the capital of the United States is 68.3 square mi/177 square km.  In other words, the Station Fire burned an area over 3.5 times the area of the capital of the United States.  That's a pretty big fire.

There are miles and miles of this:
Burn area from the 2009 Station Fire
If you look at the above two photos, I think you'll see a powerful argument for something like a Ti-Tri Caldera Cone:  fire safety.  Will using a Ti-Tri Caldera Cone (or any wood stove) eliminate the danger of a wildfire?  No, of course not.  But a small, contained fire that is comparatively easy to extinguish is safer than a traditional open fire.  Regardless of whether you use a wood stove or not, I encourage you to be safe with fire.  Again, look at the above two photos, taken about 2.5 years after the fire.  Fires can be truly devastating.  When you leave a campsite, please make sure your campfire is out, dead out.

OK, Hikin' Jim will now get off his soapbox.  :)

Hey, HJ, how about some cooking?

Ah, yes, well that is the subject of today's blog post isn't it?  Well, let's have a look.  First, I set my Ti-Tri Caldera Cone up, fill it with wood, and fire it up.
A Sidewinder type Ti-Tri Caldera Cone in use with wood 
By the way, you'll notice a lot of leaf litter on the forest floor.  By all rights, I should have cleared it better than I did.  You can't tell here, but I'm on the banks of the W Fork of the San Gabriel River, and everything is a bit damp.  With all that water, I wasn't too worried about a fire spreading, but still I probably should have cleared it.   Mea culpa.

Today, I want to cook some "real" food.  For that I'll need the steady heat of mostly coals not the intensity of burning flames.  But no need to waste the wood, let's put a pot of water on.  A little tea while we cook won't hurt anyone, now will it?  
A pot of boiling water on Ti-Tri Caldera Cone
Once things have burned down a bit, let's try some real cooking.  Let's try something fairly easy:  scrambled eggs.  In go the eggs:
Starting scrambled eggs
Now, before I go on, let me be clear:  I'm doing a bit of kludging.  Every Caldera Cone is sized to fit a particular pot.  The Cone I'm using is sized for a 1300ml Evernew pot.  My pan is bigger than a 1300ml Evernew pot.  How did I cook with my pan?  Very carefully.  :)

All kidding aside, I placed the pan on the rim of the Caldera Cone.  In terms of stability, it worked OK, but not great.  Please note that I was using a very lightweight aluminum pan with two eggs.  In other words, I wasn't putting a lot of weight on the edge of the cone.  I'm not saying this is an approved or recommended method.  Really, I just wanted to see if I could cook real food on a wood fired Caldera Cone and whether or not it might be easier than using an open fire.

And indeed one can cook real food on a Caldera Cone.  Our scrambled eggs are coming along nicely.
Scrambled eggs in progress on a wood fired Caldera Cone
And now, the finished product: 
Scrambled eggs!
I have to say that these turned out about as well as if I had cooked them at home, and this was on a fairly cheap lightweight aluminum pan.  I was quite pleased with the results.  And the taste.  :)

Next, I thought I'd try something just a bit harder:  Eggs over easy.  Other than the fact that I broke one of the yolks when I cracked the egg, I'd say they turned out rather nicely.
Eggs, over easy.  Yum!
You know, for backcountry wood fired cooking, those are some pretty good looking eggs.  I was very pleased with how they turned out.  And the pan?  No burnt spots, and no sticking.  I was very pleased.
No burned food and no sticking
Now, is my sort of kludge of balancing pan on the rim of a Caldera Cone the best set up?  No, probably not.  Better would be to find a pan the same diameter as the pot so that you could rest the pan on the stove proper and not just the rim of the cone.  Still, this does work, and it works really quite well.

Overall, it's far easier to cook real food on a wood fire with a Caldera Cone than on an open fire -- even if you have to kludge a bit.  With the Cone, it's much easier control the amount of heat and to focus the heat.  If nothing else, focused heat means your pan gets hot but the pan's handles stay cool.  Sometimes getting a pan in and out of an open fire can be quite a trick!  

I found cooking with a wood fire with a Caldera Cone was surprisingly easy.  I was very, very pleased with the results, and I plan on doing more cooking of real food on a wood fired Caldera Cone.

Thanks for joining me on another Adventure in Stoving,

HJ

Other wood fired backpacking stove posts:
  • The BushBuddy Ultra.  Craftsmanship has not gone out of style.
  • The Ti-Tri Caldera Cone -- The Ultimate Ultralight Stove System?
  • Why a Wood Stove?  More Thoughts on the Caldera Cone Ti-Tri.
  • Wood Fired Cooking on a Caldera Cone.  Cooking real food with wood.
  • BushBuddy vs Ti-Tri Caldera Cone.  Wood stoves, compared.

Other posts on the Caldera Cone:
  • Caldera Cone Alcohol Stove Review (on Seattle Backpackers Magazine) 
  • Caldera Cone Review Supplement -- Additional Photos and Technical Appendix with Weights 
  • Caldera Cone vs. Clikstand Alcohol Stove Tests 
  • The Caldera Cone's 12-10 Burner 
  • What "Color" is your Caldera? 
  • The "Magic" of the Caldera Cone (Why is the Caldera Cone so efficient?)
Read More
Posted in alcohol stove, Caldera, caldera cone, Caldera Cone Ti-Tri, Caldera Inferno, wood burner, wood gas, wood gasification | No comments

Friday, 27 January 2012

The Ti-Tri Caldera Cone -- The Ultimate Ultralight Stove System?

Posted on 19:03 by Unknown
Is the Ti-Tri Caldera Cone the ultimate ultralight stove system?

Hyperbole?  Am I being a little "over the top?"  Maybe.  But maybe not.  Let's check it out.  At the end of the post, I'll discuss why I think this triple fuel system is so darned useful that I really do consider it the ultimate lightweight stove system, particularly for mixed elevation (above and below the elevation where fires are permitted) backpacking.
The Ti-Tri Caldera Cone in wood burning mode.
Well, to get started, we're going to need a pot.  All Caldera Cones are designed to fit with a particular pot.  The Caldera Cone shown in the photo above will only fit an Evernew 1300ml titanium pot -- unless by odd coincidence there's another pot out there with the exact same dimensions.  Check the Trail Designs website for which cones will fit with which pots.
An Evernew 1300ml titanium pot
Now, notice that in the title of this post, I refer to today's stove system as the Ti-Tri Caldera Cone.  "Ti-Tri?"  What the Dickens does that mean?

Well, "Ti" is short for "titanium" and refers to what the cone (not necessarily the pot) is made out of (titanium), and "Tri" refers to the fact that this is a triple fuel stove system.  This stove system will run on three fuels:  alcohol, hexamine (e.g. ESBIT), or wood.  Now, if you've seen my previous posts on the Caldera Cone (see links at the bottom of this blog post), those were all aluminum cones.   Aluminum Caldera Cones will warp and or melt if they get too hot, so you can only burn low heat fuels like alcohol or hexamine in them.

On the other hand, titanium cones can handle heat just fine.  With a titanium cone, you can burn wood.  Why might burning wood be an advantage?  Burning wood is an advantage because you don't have to carry it on your back.  I mean, think about it:  When was the last time you saw fuel-grade alcohol welling up out of the ground?  When was the last time you picked fuel off of the ESBIT tree?  The point being that if you use alcohol or hexamine, you're not generally going to find it out on the trail.  You have to carry the fuel with you.  Wood on the other hand is frequently available from your surroundings.

In today's blog post, I'm primarily going to discuss wood burning using a Ti-Tri Caldera Cone.

OK, let's open up that pot we saw earlier and see what's inside.
The wood burning components of a Ti-Tri Caldera cone
Inside is the cone all rolled up.  Note that my cone is a "Sidewinder" type cone which is a lower slung cone that will fit inside the pot.  If you buy the "Classic" type cone, you'll need to carry something like a Caldera Caddy to hold the cone.  See What "Color" is your Caldera? for more information on the cone carry options.  Note also that the grate, wire roll, and cone normally come with Tyvek stuff sacks to prevent scratching.  I'm using a pot that does not have a non-stick coating.  No coating, no worries.  I didn't carry the Tyvek stuff sacks.

Now, let me mention that with the set up I'm showing today, I have the "Inferno" option.  The Inferno option is what transforms a regular cone into an efficient wood burner.  With the Inferno option, wood becomes your "go to" fuel.  Without the Inferno option, you can still burn wood, but efficiency and ease of use suffer.  Inside the rolled up cone are the floor, two titanium tent stakes, and the Inferno insert.  Underneath the rolled up cone is a grate.  To one side, is a rolled up wire mesh that is similar to hardware cloth.

Let's take everything out of the pot for a little better look, shall we?
The components, removed from the pot
Well, let's set that puppy up!  The cone works just like any other Caldera Cone. Just slide the dovetail joint together.
The dovetail joint slides together.
Note the extra titanium reinforcing tab.  Very solid, very well built.
An extra layer of titanium sheet is used as a reinforcement for the dovetail.
With the Inferno option, there is a second, smaller cone that is placed inverted within the primary cone.  Like the outer cone, it too is joined by a dovetail joint.
The inner cone of the Inferno option
The inner cone does not bear weight and is not reinforced like the outer cone.

Next, we roll out the floor.  On top of the floor we set the wire mesh, formed into a circle, and on top of the mesh, we place the grate.
The floor of a Ti-Tri Caldera Cone with the wire support and grate of the Inferno option
The floor does cost an additional $10.00 USD over and above the price of the Cone and Inferno option, but I'd really encourage people to consider purchasing it.  One of the drawbacks to wood fires is that they can leave fire scars all over the place.  No one wants to be hiking in an area pockmarked with your fire scars.  When using wood, I encourage you to Leave No Trace.

Now, I'm going to set the outer cone in place.  Notice that the inner cone is left off to the side just for now.  I'm leaving the inner cone out just so that the various components can be seen easily.  In practice of course the inner cone goes inside the outer cone.
The floor, wire support, grate, and outer cone with tent stakes.  Note that the inner cone is left out temporarily for photographic purposes.
OK, hopefully the various components are clear in the above photo.  Now let's add the inner cone.  The inner cone is placed upside down within the outer cone.
The Ti-Tri Caldera Cone with Inferno Option, all set up and ready to go.  Just add wood.  :)
Note that the tent stakes do not go through the oval vent holes in the cone.  There are special round holes specifically for the tent stakes.

OK, let's add fuel.  Here, your fire building skills are going to come into play.  Today, I'm going to use the "log cabin" fire lay.  I pull off the outer cone for ease of access.
A "log cabin" fire lay
To start, I place a lot of easily burned material on the very bottom layer, directly on top of the grate.  I use items such as very dry, crinkley leaves and such as my first layer.  You might also want to carry artificial tinder for fire starting purposes.  On top of my leaf tinder, I add kindling consisting of the smallest sticks that I can find.  I then add successive layers of sticks.  Each additional layer is comprised of sticks of increasing thickness.  Note that I'm stacking them in a square pattern.  This square pattern is referred to as a "log cabin" fire lay.  This type of fire lay allows for good air flow which eases fire starting and provides for good combustion.

When I've completed my fire lay, I touch off the tinder on the very bottom layer.
Starting the burn
Just one "little" problem though.  It rained today.  In fact, it was a pretty decent rain.  Everything is wet.  In fact, I deliberately chose to try the Ti-Tri Caldera Cone on a rainy day because rain is one of the facts of life of wood fires.  You have to be prepared for it to rain once in a while.  Do not assume you'll have good weather when you're out on the trail!  The fire just won't start with only my lighter.

How did I handle it?  I let the fire burn completely out, and then I added a capful of alcohol.
Re-starting the fire, this time with alcohol.
As the alcohol burns, it dries the wood.  And in a moment...
The fire takes hold
Success!  The fire takes hold.

What's that?  This is a bit contrived?

Well, maybe.  I mean I did deliberately go out on a rainy day.  But, guys, this is real world stuff. Wood fires are not automatic.  Wood fires are not like your little gas stove where you just turn the knob, hit the piezo button, and you're cooking, come rain or come shine.  You're far more at the mercy of Mother Nature.

And in case it's not obvious, you have to plan your trip such that you can find wood.  I typically like to pull into camp with plenty of daylight left if I'm going to be using a wood fire.  Finding wood in the dark is a royal pain.  You also need to allocate time for building the fire lay and getting the fire started.  Wood fires are definitely a lot more "fiddle" than using a stove with fuel that you've carried with you.  Wood fires take a lot more time, are a lot more work, and are far from guaranteed.  Of course, people have been using wood fires for centuries, so there's no reason you can't do it too, but spend some time thinking, planning, and practising.  Remember the five "P's:"  Prior Planning Prevents Poor Performance.  Wood fires are great, but don't enter in to it too lightly.  Do you're homework or you may be in for a cold, wet night out on the trail.

OK!  Enough lecturing from worry wart Jim.  Let's get on with it.

Now, when you put the pot on, place the handles away from the cut out where the handle would stick out if you were using alcohol or hexamine. Flames are going to come shooting out of that spot.  It's no place for a handle!
Flames will come out of the handle opening.  Position your pot accordingly when using wood!
This is NOT where you want to position your handles!
Flames exiting out the handle opening.
Of course, if the wind kicks up a little, you do get some cool flame plumes out the handle slot.  :)
A plume of flame exiting out the opening for the pot handles
That handle slot isn't just a source of neat pyrotechnics; it has a very practical function:  You can add wood without removing the pot or interrupting the cooking process.  Sweet!

Now, as a stove, how well does this ensemble work?  It works great. In fairly short order, I had a pot of boiling water.
Water boiling on a Ti-Tri Caldera Cone fueled by wood
And it's a really good, strong boil.  Nothing insipid about it.
A vigorous boil on a wood fired Ti-Tri Caldera Cone
OK, so we can definitely boil water.  Now, let's have a look "under the covers."
A look in through the handle opening
Take a look at that wood burning.  That is HOT.  The inferno option lives up to its name, producing a good, hot fire.

OK, let's pull the pot off and have another look.
The Inferno option at work
It's pretty easy to see why they call it the Inferno option.  Those sticks are pretty well burned down by this stage of things, but there's still a lot of combustion going on.  And those coals will put out a nice consistent heat.

Hmm.  A nice consistent heat, eh?  Let's try something.  Let's put that pot of boiling water back on.
Water NOT boiling over a wood fire.
This photo is a little dim, but notice that the water is not boiling.  In other words, with the Tri-Ti Caldera Cone and a bit of experience, one can do more than just boil water.  No, not exactly the convenience of gas, but one can vary the heat and do more than just boil water.

Now, in the process of cooking and experimenting with this stove, I filled it with sticks and let it burn down four times over the course of the evening without emptying the stove.  Well, with all that wood, you'd think I'd have a big pile of ash.
Even though I reloaded four times, all that was left at the end was this little bit of ash
Nope.  Even though I reloaded the stove four times, all I had left at the end was a little bit of powdery white ash.  Let me stress that:  White ash.  No chunks of charcoal.  Guys, this Inferno option really works.  That is really good, complete combustion.  And that little bit of powdery ash is very easy to dispose of.  Just dig a little cat hole with whatever you're using for a potty trowel and dump the ash in.  Replace the soil, and you're done.  No fire scar.  Sweet.

And no difficulty putting out the fire.  I've had wood fires that were a huge, time consuming hassle to put out.  I had to go multiple times back to the creek fill all my water carriers and schlep water back up to camp to put the darned thing out.  With a Ti-Tri Caldera cone, it'll combust so completely that it will burn itself out.  There's really no fire to put out.  Just hand check the ashes to make sure they're cool, and you're pretty much done.  The ashes can be disposed of in small cat hole.

DISCUSSION
OK, so it's a nice stove, but c'mon.  The ultimate ultralight stove system?

Well, why might I call this the ultimate ultralight stove system?  OK, what's generally the heaviest portion of an ultralight stove set up?  The fuel.  With the Ti-Tri in wood burning mode, there is no fuel to carry.  There is no fuel lighter than no fuel at all.  In wood mode, your fuel weight is zero.  Pretty tough to top that.

OK, yeah, zero fuel weight is pretty cool, but aren't there a lot of other wood burners out there?

Indeed there are, but this one, being titanium, is pretty doggone light.  Not only is it light, it's compact.  It rolls up and fits in your pot (note that there are different types of Caldera Cones out there that store different ways.  Refer to TrailDesigns.com for further information.)

But those things alone aren't why I call the Ti-Tri Caldera Cone the ultimate ultralight stove system.  The real key here is flexibility.  With a lot of wood stoves, you pretty much have to burn wood every time you cook.  Not so with the Ti-Tri Caldera Cone.  The Ti-Tri Caldera Cone runs equally well on hexamine (e.g. ESBIT) or alcohol as it does on wood.

Consider a recent backpack I went on.  The first night, I camped at 5000ft/1500m.  The second night, I camped at 8000ft/2400m.  The third night, I camped at 10500ft/3200m.  The fourth night, I camped at 11,500ft/3500m.  Wood fires above 10,000ft/3050m are generally illegal in the Sierra Nevada where I like to hike.

Do you see what's going on here?  A stove that only burns wood is no good to me.  I need a stove that can work in wood or non-wood mode equally well.  The Ti-Tri Caldera Cone is that stove.

And look at the advantages.  The first two nights, I can cook with wood.  That's half the nights of my trip.  I can bring half the fuel.  What's the weight penalty for bringing the Inferno option?
Item Grams
Wire roll 9
Grate 15
Stakes 14
Floor 18
Inferno 25
Total Wood 81


On any trip where I can save a fuel weight of at least 81g/2.86oz, I come out ahead by leaving some of the fuel at home and bringing the inferno option.

With the inferno option, I can also adopt a different style of use, one that doesn't need to skimp on fuel.  What would you do if you have a virtually unlimited supply of hot water?  How about a hot shower?  Yes, I'm serious.  OK, it's a bit of a luxury, but you rig up your hydration bladder, and...  Well, you get the idea.  I mean, if you've got wood, why limit your thinking?  This could be pretty sweet after a week on the trail.  :)

That and there's something to be said for the satisfaction of working with a wood fire.  A gas stove?  Well, it's almost too easy.  With wood, you really feel like you've earned it.  And there's just something primordially satisfying about cooking on a wood fire.

Is a wood stove for everyone?  Certainly not.  If you're planning on long days on the trail where you're getting up before first light and stopping to camp at last light, then maybe wood isn't for you.

But on those trips where you need to have a mix of fuels and you have time to prepare and use a wood fire, the Ti-Tri Caldera Cone is the ultimate ultralight stove system.

Special thanks to Randy from Colorado who made his Ti-Tri Caldera Cone available for my evaluation.

HJ


Other wood fired backpacking stove posts:
  • The BushBuddy Ultra.  Craftsmanship has not gone out of style.
  • The Ti-Tri Caldera Cone -- The Ultimate Ultralight Stove System?
  • Why a Wood Stove?  More Thoughts on the Caldera Cone Ti-Tri.
  • Wood Fired Cooking on a Caldera Cone.  Cooking real food with wood.
  • BushBuddy vs Ti-Tri Caldera Cone.  Wood stoves compared.

Other posts on the Caldera Cone:
  • Caldera Cone Alcohol Stove Review (on Seattle Backpackers Magazine) 
  • Caldera Cone Review Supplement -- Additional Photos and Technical Appendix with Weights 
  • Caldera Cone vs. Clikstand Alcohol Stove Tests 
  • The Caldera Cone's 12-10 Burner 
  • What "Color" is your Caldera? 
  • The "Magic" of the Caldera Cone (Why is the Caldera Cone so efficient?)

Technical Appendix -- Weights

Key weights 
Full Wood Mode (Inferno Option)  126g/4.44oz
Minimum Wood Mode (with floor)    77g/2.72oz
Non-LNT Wood Mode (no floor)      59g/2.08oz
Alcohol Mode (no stakes*)         60g/2.12oz
Hexamine (ESBIT) mode             57g/2.01oz


The above weights are for a Ti-Tri Sidewinder Caldera Cone sized for an Evernew 1300ml pot.  Weights include a strap that weighs 3g to keep the cone rolled.  Weights do not include the pot, stuff sack, or any fuel.

*Stakes are not needed for alcohol mode for a 1300ml Evernew pot because of the size of the pot's bottom and the width of the cone.  For smaller pots, stakes should be used when in alcohol mode with a Sidewinder cone.


Detailed Weights
Inner Cone (Inferno)
25g
0.88oz
Floor
18g
0.63oz
Cone
42g
1.48oz
Strap
3g
0.11oz
Gram Cracker hexamine (ESBIT) stove
12g
0.42oz
ESBIT tab (one)
15g
0.53oz
12-10 Stove
15g
0.53oz
Inferno, Cone, Floor, and Strap
88g
3.10oz
Ti Tent Stakes (each)
7g
0.25oz
Grate
15g
0.53oz
Wire Roll
9g
0.32oz
Evernew 1300ml pot with lid
133g
4.69oz
Pot Only
98g
3.46oz
Lid Only
35g
1.23oz
Full Wood Set Up (With Pot)
282g
9.95oz
Plastic bag
7g
0.25oz
Evernew Stuff Sack
23g
0.81oz
Total (All wood, alcohol, and hexamine items)
345g
12.17oz

Note:  You'd probably never carry all wood, alcohol, and hexamine items at once.  Why would anyone carry both the hexamine and alcohol set ups simultaneously?  The total listed above is for reference only.  
Read More
Posted in caldera cone, Caldera Cone Ti-Tri, Caldera Inferno, Inferno option, Ti-Tri, wood burner, wood gas, wood gasification, wood stove | No comments
Older Posts Home
Subscribe to: Posts (Atom)

Popular Posts

  • The Kovea LPG (Propane) Adapter
    I recently picked something up that turns out to be pretty useful:  A Kovea LPG (Propane) Adapter.  This adapter allows one to run a standar...
  • Stove of the Week: MSR Whisperlite Universal
    As previously announced and reported here on Adventures in Stoving, MSR is coming out with a new version of their Whisperlite stove, the W...
  • The SuperGnat (Gaz *and* Threaded!)
    There are two types of modern gas canisters for backpacking (see  Backpacking Gas Canisters 101 ). Generally, stoves built for one type of c...
  • Refilling Coleman PowerMax Canisters
    It's no secret that I like Coleman PowerMax gas canisters.  Note:  PowerMax canisters are called  just plain "Max" in some loc...
  • Stove of the Week: MSR Rapidfire
    OK, so this week's stove is a bit of a "sleeper" in the sense that it's not a stove that you would expect a lot from -- un...
  • Stove of the Week: The Caldera Cone
    This week's stove is the Caldera Cone with 12-10 stove from Trail Designs . My review of the stove is available at Seattle Backpackers M...
  • Stove of the Week: Primus Omnifuel
    If you want a stove that runs like a Swiss watch, then the Primus Omnifuel is your stove. It's precision engineering at it's best.  ...
  • Stove of the Week: Hank Roberts Mini Stove, Mark III
    I happen to like my old Hank Roberts stove, a stove that dates back to the 1960's. It's in very nice condition. I have the Mark I...
  • The Soto Muka Stove (OD-1NP) -- Review Supplement
    Soto has recently put out the powerful yet quiet Muka gasoline stove (OD-1NP). The Soto Muka stove (OD-1NP) in operation. The Soto Muka is a...
  • 100% Propane for Backpacking? YES!
    What's the "holy grail" of canister gas for cold weather backpacking?  100% propane.  Propane is the best.  Plain butane won...

Categories

  • 100% propane
  • 12-10
  • 12-10 burner
  • 2012
  • adapter
  • alcohol burner
  • alcohol fuel
  • alcohol stove
  • all fuel
  • all fuel stove
  • Appalachian Trail
  • AT
  • back country
  • backpacker
  • backpacking
  • backpacking canister
  • backpacking espresso
  • backpacking fuel
  • backpacking fuel prices
  • backpacking stove
  • beginner stove
  • best alcohol
  • best gas cold
  • best gas cold weather
  • best stove
  • blended fuel
  • blog status
  • boil
  • borde benzin brenner
  • borde bomb
  • borde stove
  • BPL
  • BPL Firelite
  • BPL Firelite 550
  • Bush Buddy
  • Bush Buddy Ultra
  • bushbuddy
  • bushbuddy ultra
  • butane
  • butane adapter
  • butane refill
  • butane stove
  • Caldera
  • Caldera Caddy
  • caldera cone
  • Caldera Cone Ti-Tri
  • Caldera Inferno
  • California Campfire Permit
  • Camp 5
  • camping
  • Camping Gaz
  • canister
  • canister cold
  • canister explosion
  • canister formats
  • canister gas
  • canister gas cold
  • canister refilling
  • canister stove
  • canisters
  • cartridge refill
  • cartridge stove
  • cat can stove
  • Cheap Deals
  • cleaning wood soot
  • Clikstand
  • cold
  • cold weather
  • cold weather gas
  • Coleman
  • coleman fuel
  • Coleman Max
  • Coleman PowerMax
  • Coleman Xpedition
  • Coleman Xpert
  • Coleman Xtreme
  • Crux
  • denatured alcohol
  • disk stove
  • EFI
  • Esbit
  • Espresso Star
  • ethanol
  • ethyl
  • Evernew
  • expedition
  • extreme cold
  • fast boil times
  • FeatherFire
  • fuel
  • fuel cube
  • fuel gauge
  • fuel price
  • fuel prices
  • fuel quantity
  • fuel tablet
  • gas
  • gas cartridge
  • gas cold weather
  • gas explosion
  • gas formats
  • gas gauge
  • gas refill
  • Gas stove
  • Gaz
  • gear
  • gear review
  • Gerry Stove
  • getting started
  • GigaPower
  • Gnat
  • GS-100
  • Hank Roberts
  • Hank Roberts Mini Mark III
  • Hank Roberts Mini Stove
  • heat exchanger
  • heat shield
  • HEET
  • hexamine
  • hexie
  • hiking
  • hybrid stove
  • Inferno option
  • integrated canister stove
  • Internationale
  • inverted canister
  • inverted gas
  • isobutane stove
  • JetBoil
  • JetBoil Cooking
  • JetBoil danger
  • JetBoil failure
  • Jetboil fry pan
  • JetBoil melt
  • Jetboil omelet
  • Jetboil omelette
  • Jetboil pan
  • JetBoil problem
  • JetBoil Sol
  • JetBoil Sol Ti
  • jetboil Sumo
  • KB-1006
  • kerosene
  • Kovea
  • Kovea Camp 4
  • Kovea Camp 5
  • Kovea Moonwalker
  • lighter
  • liquid feed
  • liquid feed gas
  • liquid fuel
  • Mark III
  • Max
  • melted heat exchanger
  • methanol
  • metho
  • metho stove
  • meths
  • meths stove
  • methyl
  • methylated spirits
  • micro regulator
  • micro rocket
  • microregulator
  • microrocket
  • mini bull
  • Mini Bull Designs
  • Mini Mark III
  • Mini Stove
  • minibull
  • Monotauk
  • Monotauk Gnat
  • Moonwalker
  • MSR
  • MSR canister
  • MSR Espresso Star
  • MSR micro rocket
  • MSR microrocket
  • MSR pocket rocket
  • MSR pocketrocket
  • MSR Rapidfire
  • msr reactor
  • MSR Simmerlite
  • MSR super fuel
  • MSR SuperFly
  • MSR Titan kettle
  • MSR Whisperlite
  • MSR whisperlite universal
  • MSR Windpro
  • MSR Windpro II
  • msr xgk
  • muka
  • muka od1-np
  • muka od1np
  • muka stove
  • Muka ストーブ
  • multi fuel
  • multifuel
  • n-butane
  • new
  • Nion 3
  • Nova
  • od-1np
  • od-1R
  • od1np
  • od1r
  • Omni Fuel
  • Omnifuel
  • open jet stove
  • Optimus
  • Optimus Crux
  • Optimus Nova
  • pack stove
  • PackaFeather
  • petrol
  • petrol stove
  • piezo
  • piezoelectric
  • pocket rocket
  • pocketrocket
  • pots
  • Powermax
  • PowerMax refilling
  • practical
  • pre shaker jet
  • pre-heat loop
  • pre-Katadyn
  • price
  • Primus
  • Primus Omnifuel
  • propane
  • propane adapter
  • propane backpacking
  • propane stove
  • radiation shield
  • Rapidfire
  • reactor
  • refill canister
  • refilling backpacking
  • refilling butane
  • remote canister
  • remote gas
  • review
  • side laying canister
  • simmer control
  • simmering
  • simmering alcohol
  • Simmerlite
  • snow melting
  • Snow Peak
  • SOD-300
  • SOD-371
  • SOD300
  • SOD371
  • Sol
  • Sol Ti
  • solid fuel
  • soto
  • soto microregulator
  • soto muka
  • soto od-1R
  • soto od1-np
  • soto od1np
  • Soto pocket torch
  • stove
  • stove fuel
  • stove review
  • super fuel
  • SuperFly
  • superfuel
  • SuperGnat
  • threaded canisters
  • ti wing
  • Ti-Tri
  • Tibetan Ti Wing Stove
  • tips
  • Titan kettle
  • titanium
  • top mount canister stove
  • top mounted canister stove
  • Trail Designs
  • Trangia
  • two burner
  • ultralight
  • Universal gas
  • unsafe
  • upright canister stove
  • warning
  • whisperlite
  • whisperlite universal
  • white gas
  • white gas stove
  • white gasoline
  • wind
  • Windpro
  • Windpro II
  • windscreen
  • windscreens
  • wood burner
  • wood cooking clean up
  • wood gas
  • wood gasification
  • wood stove
  • XGK
  • xgk ii
  • Xpedition
  • ボルドーバーナー

Blog Archive

  • ▼  2013 (18)
    • ▼  May (2)
      • Fire Safety -- Alcohol vs. ESBIT?
      • Blog Status, 1 May 2013
    • ►  April (5)
    • ►  March (6)
    • ►  February (5)
  • ►  2012 (54)
    • ►  September (2)
    • ►  June (3)
    • ►  April (5)
    • ►  March (12)
    • ►  February (13)
    • ►  January (19)
  • ►  2011 (65)
    • ►  December (15)
    • ►  November (13)
    • ►  October (7)
    • ►  September (3)
    • ►  August (5)
    • ►  July (2)
    • ►  June (3)
    • ►  May (2)
    • ►  April (1)
    • ►  March (5)
    • ►  February (5)
    • ►  January (4)
Powered by Blogger.

About Me

Unknown
View my complete profile